
Stack Navigator
前回はExpoとReact Nativeの環境構築について解説しました. 今回はネイティブアプリの画面遷移でStack Navigatorライブラリを使用します. React Navigationにひな形のコードが記載されているのでそれを利用します.
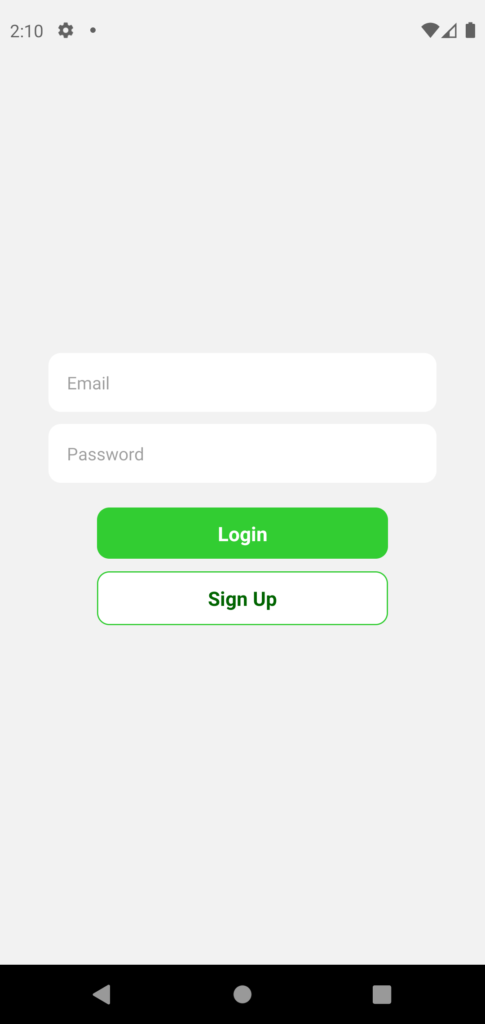
アプリを立ち上げた時に最初にログイン画面が表示されるよう、Login.tsxを作成します. スタイルはお好みで変更してください.
Login.tsx
import { KeyboardAvoidingView, TouchableOpacity, StyleSheet, Text, TextInput, View } from 'react-native';
import React, { useState } from 'react';

const Login = (): JSX.Element => {

  const [email, setEmail] = useState<string>('');
  const [password, setPassword] = useState<string>('');

  return (
    <View style={styles.container}>
      <View style={styles.inputContainer}>
        <TextInput
          placeholder='Email'
          value={email}
          onChangeText={text => setEmail(text)}
          style={styles.input}
        />
        <TextInput
          placeholder='Password'
          value={password}
          onChangeText={text => setPassword(text)}
          style={styles.input}
          secureTextEntry
        />
      </View>

      <View style={styles.buttonContainer}>
        <TouchableOpacity
          onPress={() => {}}    // 後でlogin関数を追加します
          style={styles.button}
        >
          <Text style={styles.buttonText}>Login</Text>
        </TouchableOpacity>
        <TouchableOpacity
          onPress={() => {}}    // 後でSignUpスクリーンへの遷移を追加します
          style={[styles.button, styles.buttonOutline]}
        >
          <Text style={styles.buttonOutlineText}>Sign Up</Text>
        </TouchableOpacity>

      </View>
    </View>
  )
}

export default Login;

// StyleSheetは省略します. ソースコードをご確認ください.
ログイン後にHome画面に遷移するよう、Home.tsxを作成します.
Home.tsx
import { StyleSheet, Text, View } from 'react-native';
import React from 'react';

const Home = (): JSX.Element => {
  return (
    <View>
      <Text>Home</Text>
    </View>
  )
}

export default Home;

// StyleSheetは省略します.
Login.tsxとHome.tsxをApp.tsxにimportし、Stack Navigatorのひな形を追加して次のように記述します.
App.tsx
import { StyleSheet, Text, View } from 'react-native';
import { NavigationContainer } from '@react-navigation/native';
import { createNativeStackNavigator } from '@react-navigation/native-stack';
import Login from './screens/Login';
import Home from './screens/Home';

const Stack = createNativeStackNavigator();

export default function App(): JSX.Element {
  return (
    <NavigationContainer>
      <Stack.Navigator>
        <Stack.Screen
          options={{ headerShown: false}}
          name="Login" component={Login}
        />
        <Stack.Screen name="Home" component={Home} />
      </Stack.Navigator>
    </NavigationContainer>
  );
}

const styles = StyleSheet.create({
  container: {
    flex: 1,
    backgroundColor: '#fff',
    alignItems: 'center',
    justifyContent: 'center',
  },
});
以上のように記述すると、エミュレーター画面は次の画像のように表示されると思います.
次回は本題のFirebase SDKのfirebaseConfigを.envファイルに記述する方法についてです.